Live Action Set : Wizard of Oz


Live Action Plate
I knew in the original reference image, the background was somewhat bare (with a dirt road/incline and the stormy clouds), so I tried to take photographs at a couple of different locations to get a similar feel. Since it was recommended to shoot on an overcast day, I began the modeling process before having the photograph plate and waited until it was overcast to go out and take pictures. Unfortunately for the live action plate, there are a number of trees where I live so I had to make do with the scenery that was available. After taking the photos, I went back through each one and compared it with the original image to narrow down the candidates that matched the horizon line of the reference the closest. After consulting with Professor Thomas about the two final images, he agreed that the one shown below matched the closest.

NURBS Modeling
After getting my reference image approved, I started modeling the house in Maya using the primitive NURBS cubes to block out the shapes and proportions of different parts of the house: the main body of the house, the wooden "frame" that consisted of the vertical side wood piece, 14 horizontal wood planks spanning across the front of the house, with the two bottom planks being different sizes than the 12 planks above them, the placeholder where I was going to cut a hole for the window, a cube at the bottom for the brick base of the house, and the roof.
Once I had my shapes in, my next order of business was to figure out how to cut a hole out of the surface of my cubes for the window. I learned that I could make a NURBS square to project onto the surface and subsequently trim it to keep the parts around the hole. However, my mistake was to use the default NURBS square as my curve. I was able to project it onto the surface but ran into issues when trimming because I needed a "curve" to trim the surface. Eventually I learned that Maya doesn't recognize the default NURBS square as one single curve, because it is made up of four different curves for the sides. After following a tutorial to attempt to combine the four curves into one curve and failing because the tutorial was on an older version of Maya, I ended up making my own NURBS square using the create CV curve tool and turning on the 1 Linear option (located when clicking the box next to create-> CV Curve Tool). After I laid out the points, I right clicked and chose the "Control Vertex" option and held down the "X" key on my keyboard while in the move tool to snap each vertex to the grid and make sure the lines were perfectly straight. After creating the hole in the body of the house, I did the same to the horizontal planks (making a new square curve, since I had issues when using the same curve as before due to the fact that the projection/trimmed surface changes when the original curve is moved).


It was at this point that Professor Thomas started to critique my peers' models in class and made it clear that the straight edges were repeatedly an issue to fix throughout everyone's projects. After this class period, I went back to my own model and saw that there were straight edges everywhere that I needed to fix. This was a challenge, since there isn't an easy way to bevel the edges of NURBS like there is with polygons. Eventually after experimenting, I figured that the best way to replicate the beveled edges I needed was to make a base polygon cube, bevel it with the number of segments and size I wanted, and then go into the top orthographic view to utilize the create CV curve tool and go over the outline of the beveled cube. After getting the approximate square curve with rounded edges, I adjusted the vertices to more closely match up with the beveled reference. Once I had my rounded square template, I duplicated the curve and lofted between the two curves to create my pseudo-beveled edge surface. I went back to my model and replaced most of the geometry with the "beveled" surface.


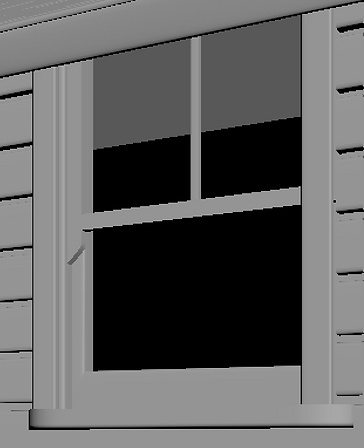
After putting all the beveled surfaces where their primitive NURBS cube counterparts were previously, I set out to add detail to the window frame. I wasn't sure how how to approach the shape of the frame while also having the effect of a beveled edge. I tried making a more angular "U" curve and used one of the rounded rectangle curves I'd made earlier to extrude along the curve but the results weren't perfect. After moving the control vertices of the NURBS surface, I got it more aligned but there were vertices that had gotten inside of the shape and were causing weird deformations when viewed from the camera angle.


Looking at the frame I made, it didn't look right or believable to me, so I went back to the movie and looked at the frames of the house before and after the frame that I chose to replicate. Doing so made me realize that the window frame wasn't just one rectangular shape, but multiple parts: two sides of the frame and then a bottom ledge-like piece that stuck out of the frame. After discovering this, I scrapped the original frame I made and went into it with the new information. I adjusted the angular "U" curve to be more shallow and tried duplicating and lofting the curve. However, this shape didn't look right. I played around with the NURBS bevel tool and was able to come across a shape similar to what I was looking for.

After that I constructed the rest of the frame using the beveled plank shapes I'd created earlier. The next tricky part of the window was the inside frame that can supposedly be moved to open and close the window. The inside frame's shape was more irregular than a box shape, since there is a curved part sticking out of the bottom. To recreate this shape, I went back to the create CV curve tool with the 3-cubic setting and drew out the curve. When on this setting, I learned that can get sharp corners by clicking on the same spot around 4-5 times before drawing the next point (otherwise the tool will try to curve everything). I tried lofting and capping the shape and also using the bevel tool and capping it, but the former yielded better looking results. I had some trouble moving the surfaces from where I had created them and editing them to better fit the window shape, so I ended up moving just the base curve into place in front of the window, readjusting the size, and redoing the process of lofting and capping.

The next part I focused on was the roof and shingles. I noticed there was an additional, thin plank of wood on top of the roof that hangs over the base, so I added that geometry from the base bevel shape I'd been using, and started to work on the shingles. To create the shingles, I looked a reference images of what roof shingles look like, and constructed the actual tiles using the curves and lofting technique. I'd laid out the tiles in a pattern and tried to change the pattern up for a few rows of the shingles before duplicating groups of the tiles repeatedly to move and adjust on top of the roof geometry.
Unfortunately, something went wrong with Maya while I was working on this part of the model and the file I was working in corrupted. After Maya quit in the middle of my work session, every time I tried opening any of the files Maya would crash and give me the same error message that Maya had quit unexpectedly and to send a crash report. Eventually I was able to recover an older backup of my work, but had to redo parts of the model to recover what I'd lost. Additionally, there are parts of the model that disappeared from the model in the viewport, but are still in the outliner and show up in the render. I'm still not sure if this is just an issue with my Maya or with the file in general. After the initial corrupted file, Maya still glitches and introduces problems in my geometry but I make sure to save frequently and save iterations in different files.
In the frenzy of trying to fix and recover my corrupted files and the aftermath, I forgot to take screenshots of my progress. However, I finished the roof and moved on to modeling the fences. I didn't find a good way to recreate the fence post shapes using just NURBS, so for this part I modeled the posts in polygons and converted from polygons through the tip that was mentioned in class : modify->convert->polygons to subdivide, modify->convert->subdivide to NURBS. One thing to be aware of is that once you convert it to NURBS, the surfaces will be a bright green color. To fix this you need to apply a texture to it, a lambert or PxrSurface is fine for the modeling stage.
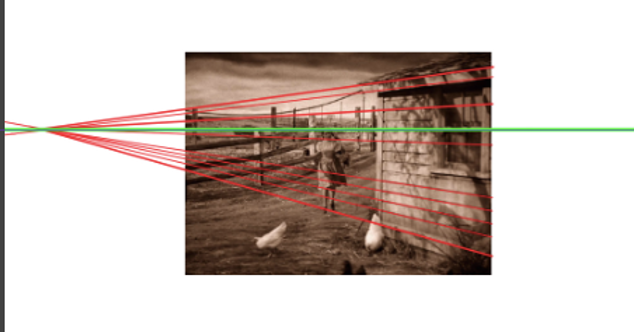
After this, I used my base beveled plank surface to create the horizontal wood planks of the fence. Throughout this process, I also put in my live action plate and camera information into Maya. The perspective was confusing me, I wasn't sure why the grid/ground plane in Maya wasn't lining up with what I thought was the horizon line. I went back to the original reference image and mapped out the lines on the house to see where they converged, and found that the vanishing point for the house and the horizon line was lower than I thought. Since my ground plane in Maya was more or less around this area, I left it and moved on to creating a curve to loft and replicate a curtain to put in the window, as well as a regular NURBS surface to serve as the flat inside curtain seen in the reference image. After this I moved on to texturing.
Texturing
For texturing, I started out with the wood textures available in Renderman's preset browser, but it wasn't looking the way I wanted. I didn't know how to rotate the direction of the wood grain, and my google searches did not help. I tried looking at the nodes in the hypershade, but I am still fairly new to Maya and have no experience with Renderman. After looking through the Renderman documentation, and experimenting with no luck, I decided to approach the texturing from a different angle. Through an older LinkedInLearning (formerly Lynda) Maya tutorial, I learned that you can project an image onto a NURBS surface by loading the image in the diffuse color area of a texture (i.e. lambert or PxrSurface) and "texture" it that way. With this knowledge, I went onto TextureHaven and found a few different wood texture images that I converted to grayscale and edited the values to use on my models. However, a couple of the wood texture images I found were plank textures, not just a single wood texture. To work my way around this, I rotated the orientation of the texture by 90 degrees and used the "Interactive Placement" option to adjust the texture until it looked the way I wanted it to. The interactive placement wasn't the easiest thing to use, since it would often move in an unexpected way or make the interactive box just a line if I moved it a certain way (which I'd then have to go into the attribute editor and change the move z value to something that wasn't 0). To make sure the planks were unique and not just the same pattern repeated again and again, I went through the process of applying the PxrSurface texture, adding the image to the diffuse color section, and using the interactive placement to move the texture by hand for each wooden plank. For the roof tiles, I kept the preset Renderman wood texture (Natural 29), lowered the specular aspect, and increased the diffuse roughness to get rid of the shininess of the original wood's texture.
Lighting
The lighting process was a lot of trial and error with positioning the lights and analyzing the reference image to decipher where lights might have been placed in the set, based on the shadows. I used a combination of Renderman's distant lights (to simulate sunlight) in front of the house and fences and slightly at an angle by the fences. I included one rectangle light towards the far side of the fences (on the right side, through the render camera) to shine a bit more light on that side and better match the reference image. Additionally, I had a light closer to the house that I could use to add a PxrCookieLightFilter to project a tree shadow. Using the PxrCookieLightFilter was a bit of a challenge for me, since it was the first time I've used a light filter in Renderman and the documentation on the Renderman website wasn't helpful in the troubles I had while setting it up. Eventually I figured out that you have to create the light filter first and then connect it to the light by right clicking the light filter section and adding the filter you made. Initially I'd been making the filter directly through the light, thinking that it would connect the two automatically but it didn't. After I made the filter, I went into Clip Studio Paint and used some foliage brushes that I used to make a base tree that I could draw on and create a black and white image that the light filter would use to project onto the house. I noticed that the light filter only takes .tex files, so after putting the tree image I made into my source images folder, I created a plane, assigned a PxrSurface and plugged in the tree image into the diffuse color of the texture. This created the .tex file of the tree image that I needed to put into the light filter. After I got the light filter to show the tree shadow, it was just a matter of moving the light and filter around to roughly the same position as the tree in the reference image and increasing the intensity of the light to produce a darker shadow. At this point the value of the house was much lighter than I wanted, so I played around with light linking to make some of the lights only hit the fences and some hit the house. This helped me control the lighting and overall value of the models. Lastly, I added a few light blockers inside the shadows of the window frame, since the light added to create the light filter was illuminating it, which both looked off and didn't match the reference. Additionally, I turned off the visibility of the tree light filter, since it was getting in the way of the camera in the viewport. However, I learned that while the filter shows up in an IPR render with the visibility turned off, you need to turn the visibility back on to do an actual render.

Compositing
To better aid in the compositing process, I made a ground plane with a NURBS surface and used it to create a holdout in Renderman. I went back and forth between Maya and Clip Studio Paint (where I was compositing the rendered out image with my live action plate), to see how the final composite would look and if I needed to tweak anything. I found that I had to adjust the lighting during this process to produce stronger shadows from the fences, since they were getting lost in the grass of my live action plate. This took a few passes of gradually increasing the light's intensity, rendering, and compositing to check if the shadows were showing on the ground properly. Finally I reached a point that I was satisfied with.
