Animated Movie Environment: Soul
Team 5 :
Andrea Ballesteros : https://andreaballeli99.wixsite.com/website
Evan Balster : https://www.evanbalster.org/soul-barber-shop-recreate
Zachary Hundley
Erin Jarrett : https://www.erinrjarrett.com/animated-movie-environment-blog
Jolena Yao
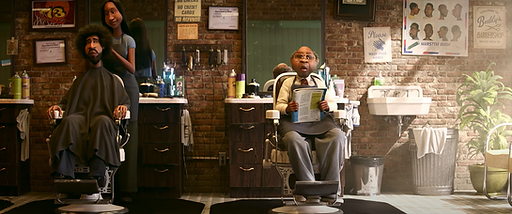
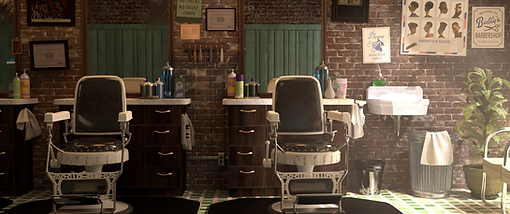
For this project, our team decided to recreate the barbershop environment from Pixar's latest movie, "Soul", with the addition of steam as our VFX.
I was responsible for:
Cabinets (all aspects)
Trash cans (texturing)
Waiting chairs (texturing)
Frames (texturing)
Hanging outlet (texturing)
wall outlet (texturing)
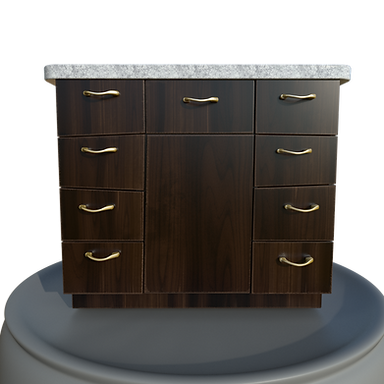
Cabinets - all aspects
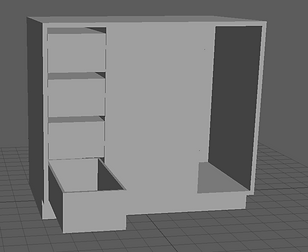
Modeling
I was responsible for all aspects of the cabinets, include modeling, UV unwrapping, and texturing. For the modeling, I started with a cube and matched the rough dimensions for the cabinet (based on the size of barbershop chairs in the real world, and thinking of the proportion in relation to it). I kept in mind that we would want to pull out some of the drawers, so I segmented off the different sections of the cabinet, extruded in areas, and added the inside drawers in addition to what was seen on the outside. I used a cube and extruded down with an offset to create the empty inside drawers.
I modeled two different cabinets so we weren't repeating the same cabinet three times in the scene, and tried to stick to the reference image as best as I could (for the parts I could see). I made sure that the drawers of the cabinets weren't straight and had a bit of quirk to them, since the cabinets in the original reference image seemed to not have just straight across edges for the drawers. After the cabinet bodies were modeled, I beveled the edges of the main cabinet and the drawers. To create the countertop I scaled a cube to the size I wanted and beveled the corners to achieve a rounded effect, in addition to beveling the edges. I struggled a bit with the handles, since the shape in the reference was unusual. To approach modeling this, I first created the two end pieces of the handle and experimented with different NURBS curves and extruding a face along the curve. After getting feedback from my teammates, I did a soft select on the handle to push it down and get the curve seen in the reference, and adjusted the size and roundness of the end pieces.
Before After
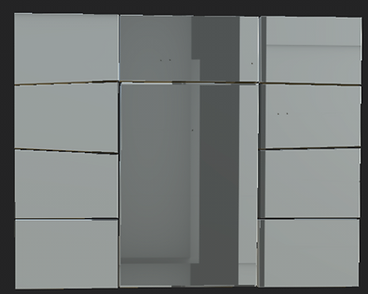
UV Unwrapping + Texturing
There was a bit of trial and error with the UV unwrapping and texturing because I am fairly new to everything and hadn't UV unwrapped much before. When I initially UV unwrapped the cabinets, I didn't know that the UV shells had to be laid out only in the positive axis, so I went through the entire process of exploding the mesh, baking the mesh maps, and surfacing it (though there were strange things happening with the mesh maps and textures because some of the UVs weren't in the positive axis).
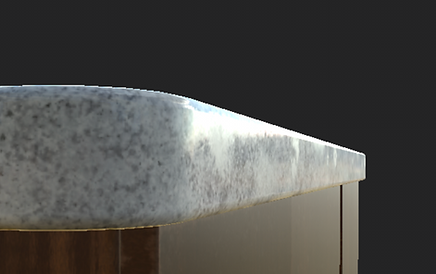
I went back and moved the UVs to be completely on the positive axis, but I didn't know I could just reimport the mesh in substance painter and completely started over from scratch. Once I exploded the mesh again, baked the mesh maps, and then started a new project with the intact mesh (with the addition of the mesh maps), I started the texturing process again. I played a lot with the coloring of the wood grains, and had a different layer with black masks for each drawer that I individually tweaked to make sure the pieces were different (while still trying to match it as well as I could with the grain on the reference image). After the wood was laid out, I went back in and painted in the wear and tear on the edges. I also had to paint some of the areas of the wood to be lighter and some areas darker, since the wood material was either too dark or too light in places. On the countertop I used a granite material and adjusted the scale and rotation of the texture so the tiling wasn't too noticeable. I repeated this process for the second cabinet as well, keeping in mind how the patterns on the cabinets in the reference image differed. After I was finished texturing in Substance Painter, I exported the texture maps and plugged them into the pxrSurface in the hypershade in Maya, using the MAPID to get all of my UDIMs connected. It was my first time using a UDIM workflow, so I had to learn more about how to connect the maps properly. Once I got the hang of it, it definitely made it easier to apply this workflow to the other models that I textured. I applied a pxrSurface to the inside drawers and changed it to a brown color, in case the inside drawers peeked through when we pulled them out for the final render. After all the modeling and texturing was done, I made groups for each of the drawers and moved the pivot points to the front, so the set dresser in the end could click on the group in the outliner and move the drawers to their liking.
After the class critique, I went back and added the smudges on the surface of the counter.


Trash Cans - Texturing
For the big trash can, I brought the model into Substance Painter and applied a rough steel texture, while adding adjustments to fit what I was going for. I also painted in some dirt towards the bottom of the trash can, and some rust on the top (around the rim), as well as in the edges of the piece where the handles are connected to the trash can
For the small trash can, I applied a shinier aluminum texture to the base and a plastic for the trash bag portion, utilizing black masks and separate layers for the two parts. I played a lot with painting on the mesh and increasing the height to create some of the wrinkling on the trash bag. I ended up having to adjust the flow and the stroke opacity, as well as blending out the ends of the strokes to achieve a more natural effect. I also played around with slightly decreasing the height on parts of the larger wrinkling that was modeled in, to better blend the model and the height map together. Afterwards, I went back and added some dirt to the bottom of the trash can and scratches to the surface of the trash can. After exporting the texture maps, I plugged everything into the two pxrSurfaces for the big and small trash cans in the hypershade in Maya. I had to go back and forth between Substance and Maya to adjust the material for the trash can, as it was showing up extremely shiny when I rendered it. I ended up changing the material to a matte plastic and increasing the roughness to help with this.
Waiting Chairs - Texturing
I brought the waiting chair model into Substance painter and applied an iron texture to the metal sides of the chairs, and one of Substance Painter's smart material fabric textures to the cushion portions of the model. I adjusted the fabric textures to look a bit more like the reference (getting rid of some of the wrinkling/folds, adding a deeper color for the fibers of the fabric), and played around with the color of the fabric (which I had to go back and forth between Substance and Maya a few times to adjust how it looks). I also painted on the edges of the cushions and on the top, to show where there might be wear on the fabric from people sitting on it. For the metal portions, I painted some worn areas where people generally touch the. most (i.e. the top and rounded corner when they are using the armrest), as well as on the bottom of the chair and where the chair meets the cushion.
Frames - Texturing
For the frames, I applied and adjusted one of the wood textures in Substance, keeping in mind to choose a wood that didn't have strong visible grain and changing the color to match the reference image. When I received the texture that make up the contents of the inside of the frame, I adjusted those textures to be square so when I imported them into Substance and put them on the mesh with an alpha, they weren't oddly distorted from Substance changing the texture to be square. I was having a bit of trouble getting the textures on some of the frames that were tilted, so I went back into Maya and straightened out the UVs to help with this issue. After that, I could put the texture on straight, and just painted in the background of parts that the inside texture didn't cover. After this, I exported the textures and connected everything in Maya similar to how I did with the previous models I textured. Additionally, I added geometry on top of each of the frames in Maya and applied a glass texture.
Hanging Outlet, Wall Outlet - Texturing
With the hanging outlet, I brought it into Substance and applied a plastic texture to the mesh and changed it to be a light gray/off white color. I felt that it needed something else added, so I applied an iron raw texture on top and tweaked it to add a little bit of variation in the plastic (similar to how some plastic outlets aren't perfectly uniform and have a little bit of texture/color variation).This most likely doesn't come across in the final scene, since it's such a small object, but I like adding little details.
For the wall outlet, I applied and played with a more rough iron metal texture. Since it is up against the brick wall and close to the floor, I painted on some dirt to both the pipe and the box outlet, just to have that detail since a perfectly clean texture isn't the most realistic/believable. Like with the other textures, I exported the texture maps and connected everything in the hypershade to the pxrSurfaces for each outlet.